Christmas Tree Charcuterie Board Recipe

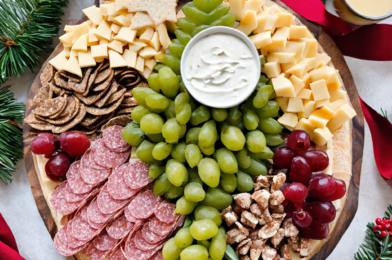
Get ready to impress your guests and take your holiday festivities up a notch with this unique and mouth-watering Christmas Tree Charcuterie Board! This festive charcuterie creation will be the star of your holiday parties, combining everyone’s favorite savory treats with a creative and visually stunning presentation.

To craft this culinary masterpiece, you’ll need a selection of delicious charcuterie items and some ingenuity in arranging them. Choose an assortment of cured meats like salami, prosciutto, and chorizo. Opt for high-quality cheeses such as creamy brie, sharp cheddar, and perhaps a blue cheese for those who appreciate its distinct flavor. Include an array of olives, nuts, and dried fruits like cranberries and apricots for a burst of color and flavor. Don’t forget the crackers and breadsticks for the perfect base!

Now, let’s get creative with the presentation! Begin by selecting a large wooden board or platter as the canvas for your edible Christmas tree. Start by layering the meats and cheeses in a triangular shape, resembling the iconic tree silhouette. Create depth and texture by folding or rolling the meats and arranging the cheeses in varying shapes and sizes.

Next, add the olives, nuts, and dried fruits, using them as ornaments to decorate your tree. Place the crackers and breadsticks around the base of the tree, offering a foundation for your masterpiece and a delicious vehicle for all the toppings. For an extra touch of Christmas magic, add a star-shaped piece of cheese or a festive cookie cutter at the top of the tree.

The beauty of this charcuterie board is not just in its appearance but also in its versatility. Guests can create their own flavor combinations, pairing meats and cheeses with the variety of accouterments you’ve provided. It’s a fun and interactive way to indulge in the spirit of the season.

Impress your guests with this creative and delicious Christmas Tree Charcuterie Board, a true showstopper that will have everyone talking and sharing photos on social media. This festive creation is perfect for holiday gatherings and will leave a lasting impression on all who experience it. So, roll up your sleeves and let your culinary creativity shine with this unique Christmas Tree Charcuterie Board!
Snowy Raspberry Jello Recipe

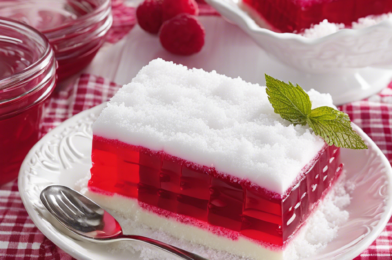
Are you ready to delight your taste buds with a delicious and refreshing treat? This Snowy Raspberry Jello recipe is perfect for those who love a sweet and tangy twist on a classic dessert. Imagine a bowl of vibrant raspberry-infused jelly topped with a blanket of creamy, snowy goodness – a truly heavenly experience!

To prepare this mouth-watering dessert, you’ll need just a handful of simple ingredients. Gather fresh or frozen raspberries, sugar, unflavored gelatin, cold water, boiling water, and heavy cream. The preparation is straightforward and fun, making it an excellent choice for both experienced bakers and those new to the kitchen.

Start by preparing the raspberry layer. In a saucepan, combine the raspberries and sugar, heating them gently until the sugar dissolves and the raspberries release their juices. This step will create a beautiful, fragrant syrup. Then, sprinkle the unflavored gelatin over some cold water to let it bloom while the syrup cools down. Once the syrup is warm, add the gelatin and stir until it’s completely dissolved. Pour this mixture into a serving bowl or individual serving glasses, and pop it in the fridge until set.

Now for the snowy part! In a mixing bowl, whip the heavy cream until it forms soft peaks. This creamy goodness will be the snow-like topping for your raspberry jelly. Once the raspberry layer is set, gently spread the whipped cream over it, creating a snowy landscape. The contrast between the vibrant jelly and the white whipped cream will be visually stunning.

The best part about this recipe is its versatility. You can serve it as a simple dessert, or you can get creative and use it as a base for more elaborate creations. Try layering it with other flavors of jelly or adding fresh fruit for a summery twist. For a fancier presentation, garnish with a sprig of fresh mint or a dusting of cocoa powder.

Whether you’re hosting a dinner party or simply treating yourself, Snowy Raspberry Jello will surely impress. Its unique texture and flavor combination will leave a lasting impression on your guests or provide a delightful moment of indulgence just for you. So, why wait? Whip up this easy-to-make dessert and enjoy a sweet escape!

Cheesy hamber and rice slow cooker recipe

# Cheesy Ham and Rice Slow Cooker Recipe: A Comforting Classic

Slow cookers are a busy home cook’s best friend, and this Cheesy Ham and Rice recipe is a delicious testament to that. It’s a comforting dish that’s perfect for a cozy family meal, offering a delightful blend of flavors and textures. And the best part? It’s incredibly easy to prepare!

The beauty of this recipe lies in its simplicity. By combining a few basic ingredients like ham, cheese, rice, and vegetables, you create a hearty meal with minimal effort. The slow cooker does most of the work, infusing the ingredients with flavor over several hours, resulting in a mouthwatering dish.

## Ingredients:

– 2 cups of cooked ham, diced
– 2 cups of long-grain rice
– 1 medium onion, chopped
– 2 cloves of garlic, minced
– 2 cups of chicken or vegetable broth
– 1 cup of frozen mixed vegetables (carrots, peas, and corn are a great combination)
– 1 can (400g) of cream of mushroom soup
– 2 cups of shredded cheddar cheese, divided
– 1/2 cup of milk
– 1/2 teaspoon of dried thyme
– Salt and pepper to taste

## Instructions:

1. Prepare your slow cooker by greasing the inside with a little butter or non-stick cooking spray. This step ensures that your delicious meal comes out cleanly later.

2. Start by layering the ingredients in the slow cooker. First, spread the diced ham evenly across the bottom. Then, add the rice, making sure it covers the ham. Next, sprinkle the chopped onion and minced garlic over the rice.

3. In a medium bowl, combine the broth, frozen vegetables, cream of mushroom soup, 1 cup of cheddar cheese, milk, thyme, and a pinch of salt and pepper. Pour this mixture over the layers in the slow cooker, ensuring everything is evenly coated.

4. Cover the slow cooker with its lid and set it to low heat. Let the magic happen and cook for approximately 4 to 5 hours. The rice will absorb the liquid and become tender, and the cheese will melt beautifully.

5. About 30 minutes before serving, sprinkle the remaining 1 cup of cheddar cheese on top. This final touch adds a delightful cheesy crust to your dish. Re-cover the slow cooker and continue cooking until the cheese is melted and bubbly.

6. Once ready, carefully remove the ceramic insert from the slow cooker and let it sit for about 5-10 minutes. This brief rest allows the ingredients to settle, ensuring a neater serving.

7. Serve this hearty meal directly from the slow cooker or transfer it to a serving dish. The cheesy ham and rice will be a hit with family and friends, offering a satisfying blend of flavors in every bite.

## Tips and Variations:

– Feel free to experiment with different types of cheese. Monterey Jack, Swiss, or even a blend of Italian cheeses can add unique flavors to this dish.
– For a vegetarian option, replace the ham with cooked lentils or chickpeas, and use vegetable broth.
– If you prefer a creamier texture, add half a cup of sour cream along with the cheese and milk.
– For a heartier meal, toss in some diced bell peppers or mushrooms with the onions and garlic.

This recipe is a versatile and delicious way to enjoy a warm, filling meal. With minimal prep time and the convenience of a slow cooker, you can have a fantastic dinner ready without much effort. Enjoy the comforting flavors of cheesy ham and rice, perfect for a busy weeknight or a lazy Sunday afternoon.

Sourdough cinnamon rolls

I’ve always believed that there’s a baker lurking inside each of us, eager to knead the dough and create something magical. And what better way to unleash that inner baker than with the timeless art of sourdough? Today, we’re taking this ancient craft to new heights with a mouth-watering twist: Sourdough Cinnamon Rolls. Picture the softest, most buttery dough infused with the tang of sourdough, swirled with a rich cinnamon-sugar filling, and topped with a creamy glaze. Get ready to indulge in a breakfast (or any time of the day) treat that will have your taste buds dancing!

**The Sourdough Advantage**
Sourdough, my fellow food enthusiasts, is not just a bread; it’s a way of life. Its unique flavor and texture come from a natural fermentation process that has been used for centuries. This traditional approach to baking not only adds depth to the taste but also makes the dough more digestible due to the beneficial bacteria it cultivates. Say goodbye to the heavy feeling of regular bread and hello to a lighter, more satisfying experience.

**Ingredients You’ll Need**
– Active Sourdough Starter: The heart and soul of your cinnamon rolls, a well-maintained starter will ensure a delicious and successful bake.
– Flour, Salt, and Sugar: The building blocks of any great dough.
– Butter and Milk: For richness and moisture.
– Cinnamon: The star spice, bringing warmth and aroma.
– Icing Ingredients: Powdered sugar, milk, and vanilla extract for that sweet, drizzling finish.

**Preparing the Dough**
The journey to perfect sourdough cinnamon rolls begins the night before with feeding your starter. This ensures it’s active and ready to work its magic. Measure out your ingredients, and let the fun begin! Mix the starter with flour, sugar, salt, and milk to form a sticky dough. Here’s the fun part: No kneading is required! Cover it and let it rest. The dough will rise, thanks to the sourdough culture feasting on the flour.

**Assembly and Baking**
After the dough has rested, it’s time to roll it out, spread a generous layer of softened butter, and sprinkle it with cinnamon sugar. Then, carefully roll the dough into a log and cut it into individual rolls. Place them in a pan, let them rise again, and bake until golden. The aroma in your kitchen will be simply irresistible!

**The Icing on the Cake… or Roll!**
As if these cinnamon rolls weren’t decadent enough, we finish them with a simple yet delectable icing. Mix powdered sugar, milk, and vanilla extract until smooth, then drizzle or spread it over the warm rolls. The icing adds a sweet touch and a beautiful presentation.

**Serve and Indulge**
These sourdough cinnamon rolls are best enjoyed fresh out of the oven, but they also make for a wonderful breakfast or snack throughout the week if stored properly. Serve them with a hot beverage, and you’ve got the perfect start to any day.

**A Step Towards Baking Bliss**
Creating sourdough cinnamon rolls is more than just a baking project; it’s an experience that connects us to ancient baking traditions. The process, though time-consuming, is incredibly rewarding. You’ll find yourself eagerly anticipating the final product, and each step will be a satisfying journey in itself.

So, are you ready to embark on this culinary adventure? Get your apron, gather your ingredients, and let the sweet aroma of sourdough and cinnamon guide you. Happy baking, and don’t forget to share the delicious results! Your friends and family will thank you for bringing a little extra warmth and flavor into their lives.

Rolled Crepes

Fluffy and delicate crepes are a delightful treat enjoyed by many, offering a versatile canvas for both sweet and savory creations. This traditional French delicacy has captivated food enthusiasts worldwide, and its thin, pliable texture allows for creative folding and stuffing with an array of fillings. The beauty of crepes lies in their adaptability, making them perfect for breakfast, dessert, or even a light meal.

The process of making crepes begins with a simple batter, typically a blend of flour, eggs, milk, and a touch of butter or oil. This batter is then poured onto a hot pan or specialized crepe maker, creating the thin, even layers that define this culinary delight. The technique of spreading the batter uniformly and swiftly is an art in itself, ensuring the crepes turn out light and consistent.
**The Joy of Flavor Combinations:**
Rolled crepes are like edible presents, each bite offering a surprise of flavors and textures. For sweet lovers, the options are endless, from classic combinations like Nutella and banana to more adventurous pairings like ricotta cheese with honey and toasted almonds. Fresh fruits, whipped cream, and a drizzle of chocolate sauce can transform a simple crepe into an elegant dessert.

On the savory side, crepes can be stuffed with a myriad of fillings, including cheese, ham, mushrooms, spinach, and more. Think of a thin, delicate omelet that can be filled with almost anything, from classic French fillings to global flavors. For instance, a crepe with goat cheese, caramelized onions, and arugula offers a sophisticated taste, while one filled with chicken, peppers, and a hint of spice caters to those who enjoy a bit of heat.

**A Breakfast Favorite:**
Crepes have earned their place as a breakfast favorite due to their versatility and ease of customization. They can be made ahead and filled with sweet or savory ingredients, making them ideal for busy mornings. Imagine waking up to the aroma of freshly made crepes, then choosing your favorite filling—a delightful way to start the day.

For those who prefer a hearty breakfast, savory crepes filled with eggs, bacon or sausage, and vegetables are a satisfying choice. On the other hand, sweet crepes with fruit preserves or maple syrup can cater to those with a sweet tooth. The beauty of crepes is that they can be tailored to suit individual preferences, making them a crowd-pleaser.

**A Global Culinary Phenomenon:**
Crepes are not just a French specialty but have become a global culinary phenomenon. They have inspired various adaptations and variations in different cultures. In Japan, you’ll find ‘Dorayaki,’ a type of crepe sandwich filled with red bean paste, while in Mexico, ‘Crepas’ are often served with chicken and mole sauce.

The adaptability of crepes allows them to seamlessly blend into various culinary traditions. Whether it’s a street food snack in Europe or a refined dessert in upscale restaurants, crepes have proven their versatility and enduring appeal.

In conclusion, rolled crepes are a culinary masterpiece, offering an enjoyable experience for both the maker and the eater. Their versatility in flavor combinations and adaptability to various cuisines have made them a beloved food item worldwide. Whether you’re a seasoned chef or a novice in the kitchen, making and experimenting with crepes can be a delightful culinary adventure.

Grinch Crinkle Cookies

Are you ready for a festive treat that will make your holidays both merry and bright? Get ready to meet the Grinch Crinkle Cookies, the perfect combination of sweet and tangy, with a touch of holiday magic! These cookies are not just a delight to taste but also a visual wonder, bringing the beloved Dr. Seuss character to life in a delicious way.

In the bustling world of holiday baking, crinkle cookies have earned their spot as a beloved classic. But this time, we’re adding a whimsical twist by transforming them into the iconic Grinch! With their vibrant green color and playful appearance, these cookies are sure to bring a smile to even the grumpiest of faces. And yes, they taste as wonderful as they look!

The secret to these cookies lies in the combination of tangy cream cheese and sweet sugar, creating a unique texture that is both crumbly and soft. Every bite promises a burst of flavor, making it impossible to stop at just one. Picture yourself biting into a soft, fluffy cloud of green goodness, with a slight tang that perfectly complements the sweetness. It’s like a magical flavor explosion in your mouth!

To begin your culinary adventure, gather your ingredients and prepare your baking station. You’ll need a few staples, including butter, sugar, cream cheese, eggs, and, of course, green food coloring to bring the Grinch’s iconic hue to life. The beauty of this recipe is its simplicity; these ingredients come together to create a delightful symphony of flavors that will impress both novice and seasoned bakers alike.

The process starts by creaming butter and sugar until they form a fluffy, pale yellow mixture. Then, add the cream cheese and green food coloring, transforming the batter into a vibrant shade of Grinch green. Gradually mix in the eggs, followed by the dry ingredients, and watch as the dough comes alive with color and texture.

Once the dough is ready, it’s time for the fun part – shaping the cookies! Roll the dough into small balls, coat them in powdered sugar, and place them on a baking sheet. As these cookies bake, they’ll transform into crinkled, sugary delights. The powdered sugar coating creates a beautiful contrast with the green dough, making them look like they’ve been dusted with freshly fallen snow.

After a few minutes in the oven, your kitchen will fill with the aroma of freshly baked cookies. As you remove them from the oven, you’ll be greeted by cookies that have cracked and crinkled, revealing a soft, chewy interior. Let them cool slightly, and you’ll have a batch of sweet, tangy treats ready to be devoured.

These Grinch Crinkle Cookies are not just delicious; they also make wonderful gifts or additions to your holiday dessert table. Imagine the delight on your guests’ faces when they see these vibrant green cookies, perfectly capturing the mischievous spirit of the Grinch. Whether you’re hosting a holiday party or looking for a unique gift idea, these cookies are sure to be a crowd-pleaser.

To make your presentation even more captivating, consider adding a few drops of red food coloring to some of the powdered sugar. This will create a festive, Grinch-themed look, with red and green colors complementing each other. Your guests will be impressed by your creativity and attention to detail.

In conclusion, Grinch Crinkle Cookies are not just a delicious dessert but also a fun way to celebrate the holidays. They are easy to make, incredibly tasty, and sure to bring joy to people of all ages. So, gather your ingredients, put on your apron, and get ready to bake some holiday magic!